


Do you have that one piece of IKEA furniture everyone seems to own? For many of us, it’s the KALLAX shelf. It’s a champion of storage, holding everything from books to baskets. But while it’s useful, it might not scream “high-end style.”
What if you could change that? What if you could take that simple, boxy shelf and turn it into a beautiful, custom-looking piece of furniture?
You can! This guide will show you how to complete the ultimate IKEA KALLAX hack. We are going to transform it into a stunning fluted sideboard that looks like it costs thousands of dollars. It’s an amazing DIY project that will completely change your space, and it’s easier than you think. Let’s get started on this amazing KALLAX transformation.
Why Hack Your KALLAX? The Look for Less
Sideboards and entryway consoles are amazing for hiding clutter and adding style. But designer pieces with beautiful details, like fluted wood, can be very expensive. That’s where the magic of an IKEA hack comes in.
This project is all about getting that expensive look for a tiny price. The KALLAX unit gives you a strong and affordable base. With a few simple materials, you can add texture, color, and a touch of class. You end up with a functional piece of furniture that looks completely custom. This DIY fluted sideboard is the perfect way to make your home feel special without breaking the bank.
What You’ll Need: A Simple Shopping List
Before you start, it’s a good idea to gather all your tools and materials. Having everything ready makes the process smooth and fun. Here is everything you need for this IKEA KALLAX hack sideboard.
| Category | Item | Notes |
|---|---|---|
| Furniture | IKEA KALLAX Unit | Any size works, but a 2×4 unit is perfect for a sideboard. |
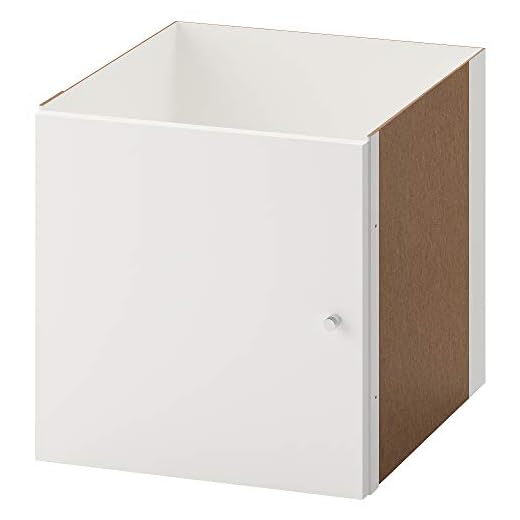
| KALLAX Door Inserts | You will need one for each cube you want to cover. | |
| Wood & Trim | Half-Round Molding | These thin, rounded wood strips will create the fluted look. |
| Prep & Paint | Adhesion Primer | Zinzer Bullseye 1-2-3 is perfect for shiny IKEA surfaces. |
| Paint Color of Your Choice | A sample pot is often enough. A satin or flat finish works well. | |
| Protective Top Coat | Clear Polyurethane (satin finish) will protect your sideboard from scuffs. | |
| Hardware | Furniture Legs (4) | Choose a style you love to elevate the unit. |
| Door Knobs or Pulls | This is the final “jewelry” for your piece. | |
| Tools & Supplies | Foam Roller & Tray | A foam roller gives you a super smooth finish with no brush marks. |
| Miter Box and Saw | A simple, non-power tool for making straight cuts in the molding. | |
| Nail Gun or Hammer & Nails | A cordless nail gun makes attaching the molding very fast. | |
| Wood Filler & Caulk | For filling nail holes and seams to get a professional look. | |
| Sanding Block | To smooth out the wood filler and rough edges. |

Step-by-Step Guide to Your KALLAX Sideboard Transformation
Now for the fun part! Follow these simple steps to complete your IKEA furniture makeover.
Step 1: Prep and Prime Your Unit
The secret to painting IKEA furniture is using the right primer. Their furniture has a slick, smooth surface that regular paint won’t stick to.
Start by cleaning your KALLAX unit. Then, using your foam roller, apply a thin coat of adhesion primer (like Zinzer 1-2-3) to all the outside surfaces. You don’t need to paint the inside of the cubes. Also, prime the front of your KALLAX door inserts. Let it dry completely. This step is the most important for a long-lasting finish.
Step 2: Paint the Foundation
Once the primer is dry, it’s time for color. Use your foam roller again to apply your chosen paint color. A foam roller helps you avoid ugly brush strokes and gives you a factory-like smooth finish.
Apply one or two coats to the outside of the KALLAX and the door fronts. Let each coat dry fully before adding the next one.
Step 3: Install the Doors (With a Twist!)
Here is the key trick for this IKEA KALLAX hack. When you install the KALLAX door inserts, you want the door to be flush with the front edge of the unit. The IKEA instructions tell you to set it back inside the cube, but we want a flat surface.
Simply push the door insert all the way to the front before you screw it in. Do this for all your doors. This creates one large, flat area across the front of the KALLAX, hiding the gaps between the cubes.
Step 4: Create the Fluted Front

Now you’ll add the beautiful fluted detail. Measure the height of your two stacked doors. Cut your half-round molding pieces to that length. A simple miter box is a great, affordable tool for getting perfect 90-degree cuts without a power saw.
Starting on one side, place your first piece of molding vertically on the doors. Use a nail gun or small nails to attach it. Place the next piece right up against the first one, and continue all the way across the doors. The rounded edges of the molding create that lovely fluted texture.
Step 5: The Finishing Touches
This is where your project goes from looking “DIY” to looking “designer.” First, take a small amount of wood filler and cover every tiny nail hole. Once it’s dry, gently sand it smooth.
Next, look at the seams between your molding pieces. If you see any small gaps, run a very thin line of paintable caulk down the seam. Wipe away any extra with your finger. This step makes the entire front look like one solid, custom piece of wood. After the caulk is dry, prime and paint the new fluted front so it all matches perfectly.
Step 6: Protect Your Hard Work
Since a sideboard is often in a busy area like an entryway, you need to protect it. Apply one or two coats of a clear polyurethane top coat. Use a foam brush for this to keep the finish smooth. This will protect your beautiful paint job from getting chipped or scuffed.
Step 7: Elevate Your Sideboard
To finish the sideboard look, you need to get it off the floor. Adding legs completely changes the feel of the KALLAX. Flip your unit over and attach the furniture legs to the bottom corners. This small step makes a huge difference and truly completes the KALLAX transformation.
Step 8: Add the Final Jewelry

The last step is to add your hardware. You can choose any knobs or pulls that match your style. Measure carefully to make sure they are all placed in the same spot on each set of doors. This final touch is like adding jewelry—it completes the whole look.
FAQs
What is an Ikea Kallax?
The IKEA KALLAX is a shelving unit. It is made of square cubes. It comes in many sizes. People use it for storage. It is very popular and versatile.
Is it safe to use Ikea Kallax as a room divider?
Yes, you can use it as a room divider. But you must make it safe. Secure it to the wall or ceiling. This stops it from falling over. Safety is very important.
What to use instead of KALLAX?
You can try other IKEA products. The EKET series has cube shelves. The BESTÅ system is more like a cabinet. You can also look for regular bookcases from other stores.
Can a KALLAX unit hold a TV?
Yes, it can hold a TV. The KALLAX must be lying down horizontally. Do not put a TV on a tall, standing unit. Always check the weight of your TV. Make sure it is not too heavy for the shelf.
How strong is IKEA KALLAX?
The KALLAX is fairly strong. It is designed to hold items like books and decor. The outer frame is the strongest part. The inner shelves hold less weight. Each cube has its own weight limit. It is strong enough for most storage needs.
Your Beautiful New Sideboard
And there you have it! You’ve taken a basic IKEA KALLAX and turned it into a stunning, high-end fluted sideboard. You now have a beautiful and practical piece that hides clutter and adds serious style to your home. It’s proof that with a little creativity, you can make your home look amazing on a budget.
Ready to tackle your own IKEA hack? Let us know in the comments if you have any questions or if you try this project yourself. We would love to see how it turns out