


Do you have a bathroom that’s stuck in the past? Maybe it has beige walls, a brown countertop, and floors that have seen better days. You dream of a beautiful, modern space, but the thought of spending thousands of dollars on a remodel makes you cringe.
I get it completely. For years, I looked at a classic 90s builder-grade bathroom and knew it needed a change. I wanted to create a designer look without the designer price tag. So, I challenged myself to a complete bathroom makeover on a budget of less than $400.
And guess what? I did it.
I’m so excited to show you how a few smart choices and a little bit of work can totally transform a room. This guide is packed with DIY bathroom ideas that are easy, affordable, and even renter-friendly. You can have the bathroom of your dreams without breaking the bank.
Our Budget-Friendly Makeover Plan
Every great project starts with a plan. My goal was to tackle the biggest eyesores in the room with simple, low-cost solutions. I wanted to prove that you don’t need to rip everything out to make a huge impact.
Here’s a look at the problems and our simple, budget-friendly fixes.
| The Problem Area | The Before | Our Budget-Friendly Solution |
|---|---|---|
| The Walls | Dated and boring beige | A fresh coat of crisp white paint |
| The Vanity | Old oak cabinets | Paint them a modern blue-gray color |
| The Hardware | Outdated brass pulls | New, modern silver knobs and pulls |
| The Countertop | Brown and dull laminate | Cover it with marble contact paper |
| The Floors | Old, dingy tile | Install beautiful peel-and-stick floor tiles |
| The Door | Plain and uninspired | Paint it a trendy sage green accent color |
Step 1: A Fresh Coat of Paint Changes Everything

Never underestimate the power of paint. It’s the cheapest and fastest way to make a room feel brand new. We said goodbye to the tired beige and painted the walls a clean, ultra-pure white.
In a bathroom, a bright white makes everything feel cleaner and bigger. It reflects light and provides a perfect blank canvas for the other changes we were about to make. We also painted the trim white to make it look crisp and new. This simple step set the stage for the entire bathroom makeover on a budget.
Step 2: Transforming the Old Vanity
The old oak vanity was functional, but it screamed 1990s. Replacing a vanity can cost hundreds or even thousands of dollars, but painting it costs less than a single drawer pull.
Choosing the Perfect Color
I wanted a color that was modern but timeless. After looking at dozens of paint chips, I found the perfect one: a beautiful blue-gray color called Mountain Pine. It felt bold yet calming at the same time. To save money, I was able to get just a small sample can, which was more than enough to paint the whole vanity.

Prepping and Painting for a Pro Finish
The key to a good paint job is good prep. First, I removed all the old hardware. Then, I gave the entire vanity a light sanding with a simple sandpaper block. This roughs up the surface just enough to help the new paint stick. You don’t need to sand it down to the bare wood, just scuff it up a bit.
After wiping away the dust, I started painting. I used a small roller for the flat parts and a brush for the detailed edges. It took two coats to get a perfect, smooth finish. The result was amazing. The vanity looked like a brand-new, high-end piece of furniture.
Adding New Modern Hardware
To complete the vanity’s new look, I replaced the old brass handles with modern silver hardware. This is one of the easiest DIY bathroom ideas and makes such a difference. The new pulls matched the existing faucets, which helped tie the whole room together. It’s a small detail that makes everything look intentional and professionally designed.
Step 3: The Secret to “New” Countertops for Less Than $30
The brown countertop had to go, but replacing it was not in the budget. The solution? Marble contact paper! I know it might sound strange, but modern contact paper is a game-changer for a renter friendly bathroom update.

It’s thick, durable, waterproof, and gives you the look of real marble for a tiny fraction of the cost. I found a roll for around $30 that was enough to cover the entire counter. Applying it was a little tricky, and it’s definitely easier with two people. But with a little patience, I was able to get a smooth, seamless look. To make it look even more real, I added a thin line of white caulk around the sink and backsplash. No one can believe it’s not a real stone countertop!
Step 4: A Dramatic Floor Update with Peel-and-Stick Tiles
Now for my favorite part: the floors. The old tile wasn’t terrible, but the brown grout made it look dirty and dated. I discovered peel-and-stick vinyl tiles from a brand called Floor Pops, and I was hooked.
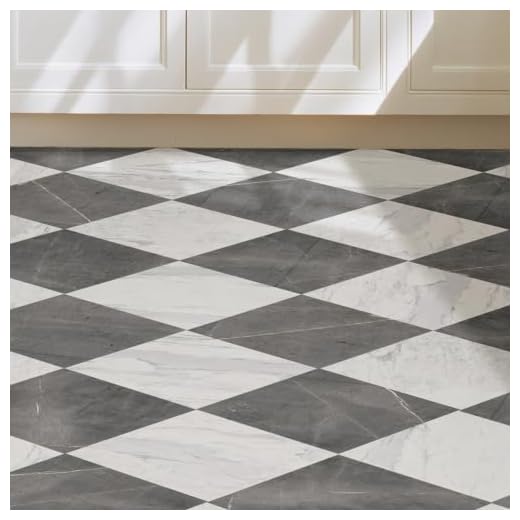
These tiles have beautiful, trendy patterns and are so easy to install. You just peel off the back and stick them right on top of your existing floor. I used scissors and an exacto knife to cut the tiles to fit around the toilet and edges. The whole process was simple and so satisfying.
This is the perfect project for a renter friendly bathroom update because the tiles can be removed later if needed. The new floor completely changed the personality of the room, adding pattern and style. It was the single biggest transformation in this whole makeover.
Step 5: The Finishing Touches

With the big projects done, it was time for the fun details that pull everything together.
I painted the bathroom door a soft, sage green color. A painted interior door is a huge trend right now, and it adds a lovely pop of color without overwhelming the space. I also swapped the old brass doorknob for a new silver one to match the vanity hardware.
Finally, I replaced the old shower curtain with a fresh white one and added some simple decorations, like a small plant and some nice soap dispensers. These small things make a space feel like a home.
The Final Reveal: Our Budget Breakdown
So, did we stay on budget? Yes! I added up every single receipt, from the paint to the new hardware to the floor tiles.
| Item | Cost |
|---|---|
| Wall Paint & Supplies | $55.00 |
| Vanity Paint & Supplies | $22.00 |
| New Vanity Hardware | $26.00 |
| Marble Contact Paper | $30.00 |
| Peel-and-Stick Floor Tiles | $60.00 |
| Door Paint & New Doorknob | $28.00 |
| New Shower Curtain & Decor | $175.00 |
| Grand Total | $396.00 |
FAQs
How can I decorate my bathroom to look expensive?
Focus on the small details. Upgrade your cabinet hardware. Buy new, fluffy towels. Use a nice soap dispenser. Add a small plant. A new mirror makes a big impact. Good lighting is also key.
What is a realistic budget for a bathroom renovation?
A full renovation is very expensive. It can cost over $5,000. This involves new plumbing and tile. A simple refresh is much cheaper. You can do it for under $500, just like this project.
How to completely remodel a bathroom on a budget?
Do not replace everything. Instead, you should refresh it. Paint your old vanity. Cover the countertops. Use peel-and-stick tiles on the floor. A fresh coat of wall paint does wonders. Do the work yourself to save a lot of money.
What is the most expensive part of renovating a bathroom?
Labor is the biggest cost. Hiring a plumber or tiler is expensive. Changing the layout costs a lot. New tile for a shower or floor is pricey. A brand-new bathtub can also be a major expense.
What is trending in the bathroom in 2025?
Warm, natural colors are popular. Think of earthy tones and wood vanities. People want their bathroom to feel like a spa. Large walk-in showers are a big trend. Statement lighting is also very stylish.
For under $400, we got a bathroom that looks like it came out of a magazine. It feels bigger, brighter, and so much more modern. Nothing we did was permanent, which makes this the perfect guide on how to update a bathroom cheaply, whether you rent or own.
This project proves you don’t need a huge budget to create a home you love. All it takes is a little creativity and a willingness to try something new.
What part of your bathroom would you love to update? Share your ideas in the comments below! I’d love to hear about your projects.