Are you exasperated by the perplexing process of inserting a bobbin into your sewing machine?
Fret not, this comprehensive guide shall unveil the arcane secrets of bobbin loading, ensuring your sewing endeavors are executed with unwavering precision and finesse. Mastering loading a bobbin into a sewing machine is a rite of passage for every seamstress, a skill separating the novice from the master crafter.
Understanding the Bobbin
Definition of a bobbin
A bobbin, a diminutive yet essential sewing machine part, is a small spool that holds the lower thread, playing a crucial role in stitch formation. Without an adequately loaded bobbin, your sewing machine would be rendered ineffectual, a decorative ornament.
Types of bobbins (plastic vs metal)
Bobbins are typically constructed from plastic or metal. Plastic bobbins, lightweight and economical, cater to the needs of hobbyists and casual sewers. In contrast, more durable and resilient metal bobbins are often employed in heavy-duty or industrial machines, withstanding the rigors of prolonged use.
Importance of proper bobbin loading
Correct bobbin loading is paramount for achieving consistent stitches, preventing thread tangles, and ensuring your sewing machine operates smoothly. A haphazardly loaded bobbin can lead to common sewing machine problems, from skipped stitches to thread breakage, undermining your hard work and creativity.
Preparing the Bobbin
Winding the bobbin thread
Before loading the bobbin, you must wind it with thread. Most sewing machines feature a built-in bobbin winder, allowing you to effortlessly replenish the bobbin’s thread supply. Simply follow the manufacturer’s instructions to ensure proper bobbin winding.
Adjusting bobbin tension
Regulating the bobbin tension is crucial for maintaining even stitches. Consult your machine’s manual to adjust the tension discs or springs accordingly. Too much stress can cause thread breakage, while too little tension may result in loose, unsightly stitches.
Trimming the thread tail
To prevent excess thread from tangling, trim the thread tail protruding from the wound bobbin to a manageable length before inserting it into the machine. A tangled bobbin thread can quickly become a nightmare, leading to frustration and wasted time.
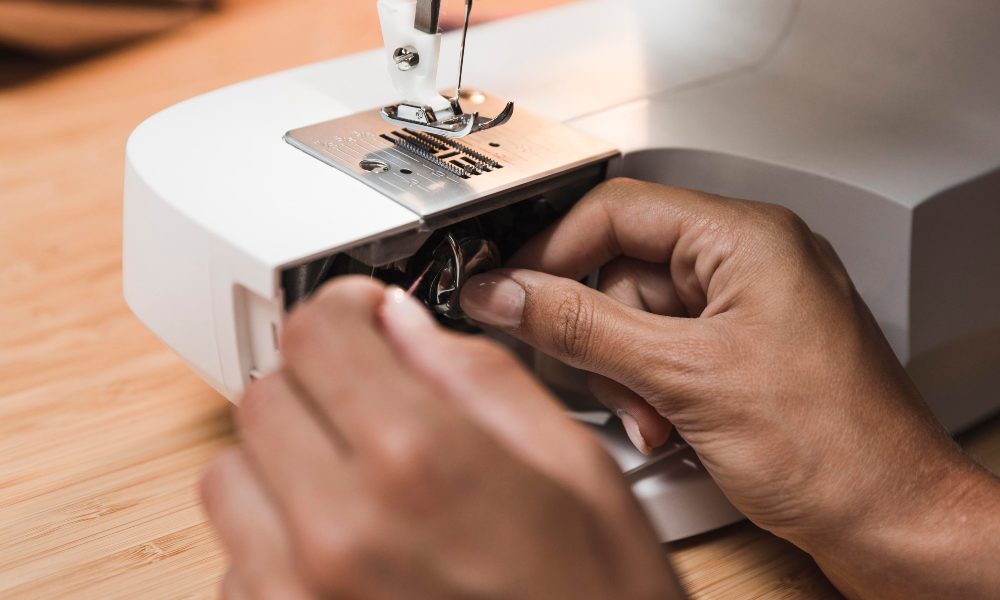
Accessing the Bobbin Case
Locating the bobbin case/compartment
The bobbin case, or compartment, is typically situated beneath the needle plate or in the machine’s free arm or top cover, depending on your model. Consult your sewing machine manual for precise location and access instructions.
Removing the bobbin case cover
Gently remove the bobbin case cover by referring to your machine’s instruction manual, exposing the bobbin mechanism. Treat this area carefully, as it houses delicate components essential for smooth operation.
Identifying bobbin case components (tension spring, tension discs)
Familiarize yourself with the bobbin case components, such as the tension spring and discs, which regulate thread tension and enable smooth bobbin operation. Understanding these intricate parts will aid in troubleshooting and maintenance.
Inserting the Bobbin

Positioning the bobbin correctly
Place the bobbin in the case, ensuring it is oriented correctly and appropriately seated according to the machine’s specifications. Incorrect placement can lead to many issues, from thread jamming to improper stitch formation.
Guiding the thread through the tension mechanism
Carefully thread the bobbin thread through the tension mechanism, following the designated path outlined in your machine’s manual. This step is crucial for maintaining proper tension and preventing tangles.
Pulling up the bobbin thread
Once threaded, gently pull the bobbin thread upward, leaving a few inches of slack to facilitate the next step. Avoid removing too forcefully, as this can disrupt the delicate tension settings.
Combining Upper and Bobbin Threads
Raising the bobbin thread
Use the hand wheel or needle position lever to raise the needle to its highest point. While doing so, ensure that the bobbin thread is also brought up through the needle plate. This step ensures the threads are correctly positioned for stitch formation.
Aligning threads and holding tails
Align the upper and bobbin threads, holding their tails together to prevent tangling during the initial stitches. A well-coordinated dance between the two threads is essential for achieving flawless results.
Ensuring proper tension
Verify that both threads exhibit appropriate tension by gently tugging them – they should feel taut yet not overly restrictive. Proper tension is the key to achieving professional-quality stitches.
Troubleshooting Common Issues
Tangled threads
If threads become tangled, stop sewing immediately and carefully disentangle them, referring to your machine’s manual for guidance. Attempting to sew through a tangled mess can lead to thread breakage and potential damage to your machine.
Inconsistent stitch formation
Uneven stitches may indicate improper bobbin tension or threading issues. Adjust the tension and rethread the machine accordingly, ensuring the bobbin and upper threads are correctly positioned and tensioned.
Bobbin tension problems
Adjust the bobbin tension discs or springs per the manufacturer’s recommendations if the bobbin thread appears too loose or tight. Improper tension can lead to many issues, from puckered fabric to skipped stitches.
Maintaining Your Bobbin
Cleaning the bobbin case
Periodically clean the bobbin case to remove lint and debris, ensuring smooth bobbin operation and preventing tension issues. A well-maintained bobbin case is essential for consistent, high-quality stitching.
Storing bobbins properly
Store bobbins in a designated case or container to prevent damage or tangling when not in use. Proper storage not only preserves the integrity of your bobbins but also ensures they are readily available for your next sewing project.
When to replace bobbins
Over time, bobbins may become worn or damaged, affecting stitch quality. Replace them as needed for optimal performance. While bobbins may seem insignificant, their role in the sewing process cannot be overstated.
FAQs:
Can I use any type of bobbin in my sewing machine?
It is crucial to use bobbins specifically designed for your sewing machine model and brand. Using generic or incompatible bobbins can lead to tension issues, thread jams, and potential damage to your machine.
What should I do if the bobbin thread keeps breaking?
A breaking bobbin thread could indicate several issues, such as incorrect threading, excessive tension, or a burr on the bobbin case. Check the threading path, adjust the tension, and clean the bobbin area thoroughly.
How often should I replace my sewing machine bobbins?
Bobbins should be replaced when they become visibly worn or damaged or if you notice a decline in stitch quality. As a general guideline, consider replacing plastic with metal bobbins every few years.
Can I use the same bobbin for sewing and embroidery?
While it’s possible to use the same bobbin for both, it’s recommended to have separate bobbins designated for each task. Embroidery often requires specialized bobbins and tension settings.
Conclusion
Have you mastered the art of bobbin insertion? Feel free to share any sewing machine questions or concerns in the comment section below. Let’s work together to master sewing by discussing our experiences and queries! Loading a bobbin into your sewing machine is an essential skill for all of your creative pursuits, whether you’re a seasoned pro or a beginner seamstress. This basic skill will serve you well in all your sewing projects, no matter how experienced you are.
***
Main image: freepik


