Are you tired of tripping over your too-long pants or feeling like your skirt is swallowing you whole? Fear not, dear reader, for the art of hem sewing is about to unveil its secrets, transforming you into a sartorial savant. Brace yourself for a journey through the intricacies of this oft-overlooked yet crucial skill, where every stitch becomes a testament to your newfound prowess.
What is a Hem?
A hem, in sewing, refers to a folded or edged narrow strip of fabric that is sewn to prevent fraying and provide a neat and polished appearance. It serves as the unsung hero, providing structure, stability, and a polished appearance to garments. Whether you’re dealing with pants, skirts, or dresses, mastering the art of hem sewing is akin to unlocking a secret code that elevates your creations from ordinary to extraordinary.
Tools and Materials Needed
Before embarking on your hemming odyssey, gather your trusty arsenal of tools and materials. To complete your sewing project, it’s important to have either a sewing machine or a reliable needle and thread. You’ll also need an iron and ironing board to smooth out any stubborn fabrics, fabric chalk or a pencil for marking, sharp scissors to cut away any extra threads, and a set of pins or clips to hold your fabric in place.
Step 1: Measure and Mark

Precision is critical when it comes to her sewing. Determine the desired length of your garment, whether you’re aiming for an ankle-grazing elegance or a knee-skimming flair. Carefully mark the new hemline with fabric chalk or pencil, ensuring a consistent and level path around the garment. Consider the hem allowance, which is the extra fabric required for the folded edge.
Step 2: Prepare the Fabric
Pressing the Hem
In the world of sewing, pressing is akin to a sacred ritual. Before you even contemplate threading a needle, ensure your fabric is pristinely pressed and wrinkles-free. This step creates a crisp foundation and instills a sense of reverence for the art you’re about to undertake.
Turning and Pinning
With the fabric pressed to perfection, it’s time to turn and pin. Fold the fabric along the marked hemline, creating a neat and uniform fold. Secure this fold with a strategic placement of pins or clips, ensuring the fabric remains taut and unwavering. For a clean finish, consider using a basting stitch to hold the hem in place temporarily.
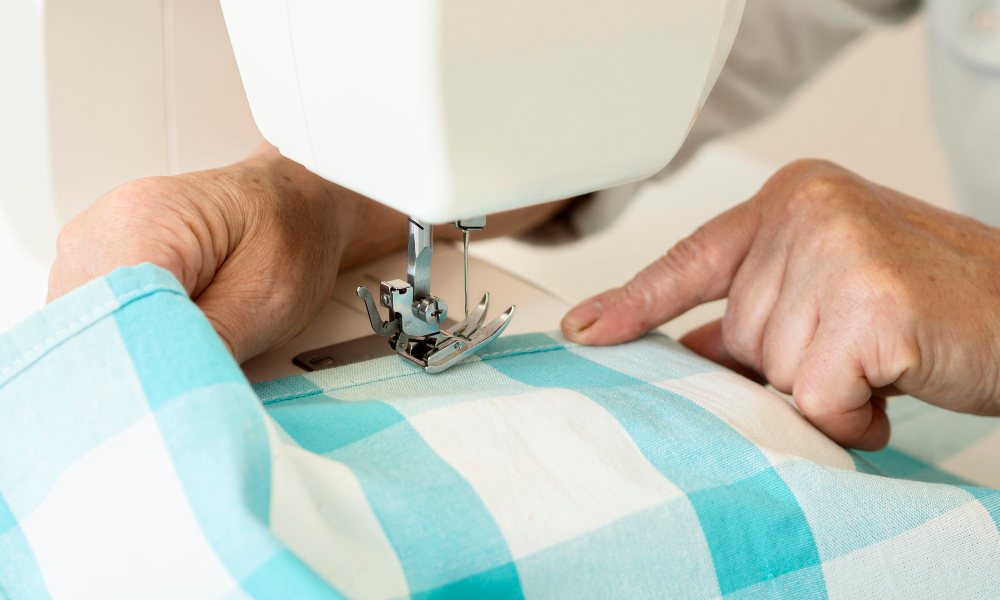
Step 3: Sewing the Hem
Machine Stitching
If you happen to enjoy the sound of a sewing machine, it’s recommended to fine-tune the stitch length and tension to accommodate the specific properties of your fabric. A straight stitch is often used for hemming, but you may also choose to use a twin needle for a decorative touch. With a steady hand and a watchful eye, guide the fabric through the machine, allowing each stitch to weave its tale of sartorial expertise.
Hand Stitching
If you’re a purist at heart, embrace the meditative art of hand stitching. Employ the blind hem stitch technique, a delicate dance of needle and thread that creates an invisible line of stitches, preserving the garment’s flawless facade. This method is beneficial for delicate or lightweight fabrics where a machine stitch may be too visible.
Curved Hems and Specialty Techniques
Not all hems are created equal. When tackling curved edges, such as those found on pant legs or circular skirts, embrace the art of easing, allowing the fabric to flow gracefully around curves. For an extra-polished finish, explore the world of bias binding, a technique that adds a touch of sophistication to every hem.
Depending on the fabric and desired look, you may also consider specialty techniques like the rolled hem, often used for sheer or lightweight fabrics, or the double-fold hem, which provides a sturdy finish for heavier fabrics.
Step 4: Finishing Touches
With the hem securely stitched, it’s time to add the final flourishes. Trim away any excess fabric, ensuring a clean and polished edge. Then, with a respectful touch, press the newly hemmed garment, bestowing upon it a crisp and immaculate appearance.
Tips and Tricks
As with any art form, hem sewing has its nuances and secrets. A gentle hand and a sharp eye are essential for those working with delicate fabrics. For flexibility when hemming knit fabrics, consider using a stretch stitch or a narrow zig-zag.
Experiment with different seam finishes, such as the Hong Kong or mock flat-fell seam, to elevate your hems to new heights. For those seeking a truly professional finish, invest in specialized tools like a blind hem foot or hem tape, which can streamline the process and ensure impeccable results.
FAQs:
What is the ideal hem allowance for different types of garments?
Generally, a 1-2 inches hem allowance is recommended for skirts and dresses, while pants may require a more comprehensive hem allowance of 2-3 inches. However, always consult your sewing pattern or desired look.
Can I hem knit fabrics the same way as woven fabrics?
While the basic hemming principles apply, knit fabrics require special techniques to prevent stretching and distortion. Consider using a stretch stitch, a twin needle, or a narrow zig-zag stitch for a professional finish.
How do I hem a curved edge, like a pant leg or circular skirt?
Curved hems require the easing technique, where you gently distribute the fabric’s fullness by slightly stretching or compressing it as you sew. This allows the fabric to follow the curve without puckering or gapping smoothly.
What is a blind hem stitch, and when should I use it?
A blind hem stitch is an invisible hand-stitching technique that creates a seamless, professional-looking hem. It’s beneficial for delicate or lightweight fabrics where a machine stitch may be too visible or bulky.
Conclusion
Are you ready to bid farewell to unsightly hems and embrace your newfound sewing prowess? You’ve woven a tapestry of skill and artistry with each stitch, elevating your garments from mere cloth to masterpieces. Embrace the journey, for the art of hem sewing is not just a skill but a testament to your dedication and creativity.
Whether you’re a seasoned seamstress or a budding fashion designer, mastering the art of hem sewing will open doors to a world of sartorial possibilities. So, grab your fabric, thread, and a healthy dose of determination, and let the symphony of needle and cloth begin!
***
Main image: freepik


