Threading a sewing machine correctly is essential for successful sewing projects. Improper threading can lead to skipped stitches, tangled messes, and frustration. Don’t let threading troubles ruin your sewing mojo! This comprehensive guide will show you how to thread a sewing machine like an expert.
Threading a Sewing Machine in 7 Simple Steps:
- Raise the presser foot and needle to the highest position
- Position the thread spool onto the spool pin.
- Feed the thread through upper thread guides
- Pass the thread through the take-up lever
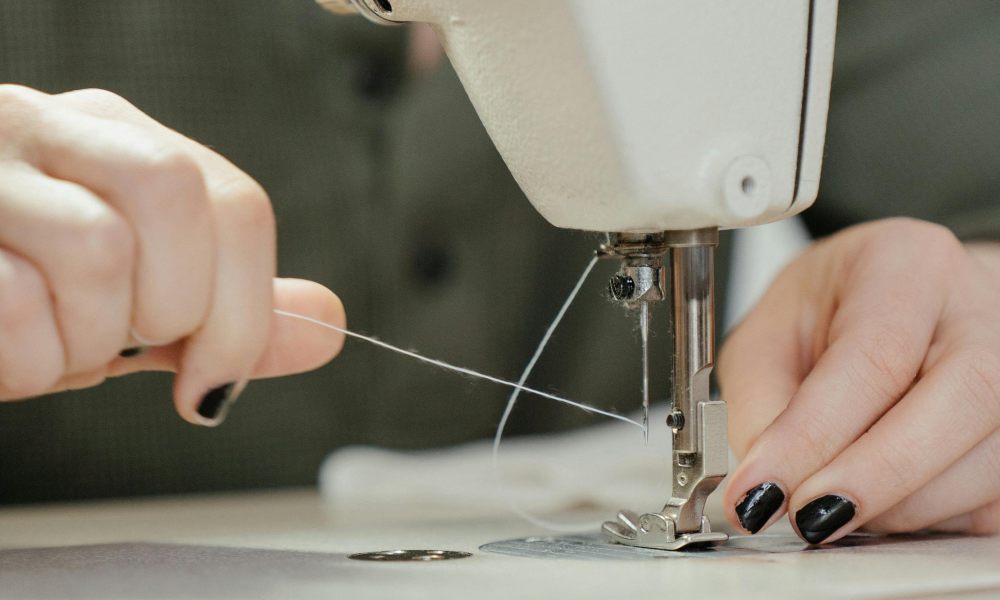
- Thread needle front to back
- Pull thread underneath the presser foot
- Lower the presser foot to secure the thread
Ready to dive into the details and master machine threading? Let’s get started!
Understanding Sewing Machine Anatomy
Before threading your machine correctly, it’s beneficial to grasp the essential components of the threading procedure. Modern sewing machines have a variety of guides, levers, and tensioners that the thread must travel through for proper stitch formation.
The Thread Path
On the top of most sewing machines, you’ll find:
- Spool Pin – This is where the thread spool is positioned to feed the thread into the machine.
- Thread Guides – Hooks, loops, or tunnels that direct the thread from the spool to the take-up lever.
- Take-Up Lever – This critical lever raises and lowers in a specific pattern to provide appropriate thread tension.
Near the needle, you have:
- Thread Guide Above Needle – Final guide that positions the thread correctly before passing through the needle eye.
- Needle – Thread must pass through the front-to-back of the eye in a single smooth motion.
- Bobbin Case – Holds the bobbin thread that intertwines with needle thread to form stitches.
Mastering where the thread needs to travel is vital for successful threading.
Thread Weight and Type

Using the correct thread weight and fiber type is also essential. Always reference your machine manual, but generally:
- All-Purpose Thread – Used for most woven fabric projects like clothing. Polyester, cotton, or poly/cotton blend threads are standard.
- Heavy Thread– Required for thick fabrics like denim, canvas, and upholstery. Look for heavy-duty polyester or cotton covered polyester threads.
- Lightweight Thread – For sheer or lightweight fabrics. Look for lightweight cotton, polyester, or silk threads.
Now that you understand the machine anatomy and thread basics let’s get into the step-by-step threading process!
Step-by-Step Machine Threading
Follow these instructions to thread the upper path of your sewing machine properly:
- Raise Presser Foot and Needle Position: Always raise the presser foot and position the needle in its highest position. This allows easy access to thread the needle and creates the ideal thread path.
- Place Thread Spool on Spool Pin Place your thread spool on the spool pin mounted at the top of the machine. If using a vertical spool pin, the thread should unspool clockwise from the spool. For horizontal pins, positioning doesn’t matter.
- Pull Thread Through Upper Guides Following the numbered guides on your machine, pull the thread through each upper thread guide in succession. Make sure the thread lays in each tension guide properly.
- Pass Thread Down Through Take-Up Lever Bring the thread down through the front groove of the take-up lever. This lever must be in its highest position for threading. Don’t skip this step!
- Thread Needle Front-to-Back Thread the needle smoothly from front to back using your fingers or an automatic needle threader. Give it a gentle tug to ensure it’s appropriately threaded.
- Pull Thread Under Presser Foot With the needle threaded, pull out about 6 inches of thread and pass it underneath the presser foot toward the back of the machine.
- Lower Presser Foot to Secure Thread Lastly, while gently holding both thread tails, lower the presser foot to secure the thread underneath. Release tails carefully.
And there you have it – your sewing machine is now perfectly threaded for sewing! Be sure to thread your machine whenever starting a new project to prevent tangled messes.
Pro Tips for Tangle-Free Threading
You may run into occasional snags or tension troubles even after properly threading. Try these tips from sewing pros:
- Use Thread Nets or Caps – These fit over the spool to control the thread as it unspools, preventing tangles.
- Hold Threads When Starting – When beginning a new seam, gently hold the needle and bobbin threads towards the back for the first few stitches to set proper tension.
- Clean machine Regularly – Lint and dust can cause skipped stitches. Use small brush and scissors to clean around tensioners and bobbin area frequently.
- Rethread Frequently – Don’t try to sew through multiple projects on the same threadings. Rethread every few hours or with each new fabric.
Troubleshooting Common Threading Mistakes
Despite your best efforts, sewing machine threading issues can still crop up. Here are some common culprits and fixes:
Thread Bunching Under Fabric
Cause: Incorrect threading around take-up lever or guides Fix: Obliterate thread and rethread upper path slowly, ensuring thread lays properly in each guide
Skipped Stitches
Cause 1: Dust or lint around tension discs preventing smooth threading. Fix: Use a small brush to clean out the tensioner area carefully
Cause 2: Incorrect threading through needle – thread caught on needle Fix: Rethread needle front-to-back in one smooth motion
Thread Catches/Breaks
Cause 1: Rough spots or nicks on the throat plate causing snags. Fix: Consult the machine manual to check if the throat plate is installed correctly. Polish with steel wool if needed.
Cause 2: Using old or poor quality thread Fix: Discard old thread and switch to quality polyester or cotton thread
Uneven Stitch Tension
Cause: Incorrect weight/fiber thread compared to bobbin thread. Fix: Use the same weight/fiber thread in the needle and bobbin. Rethread both if needed.
With some patience and these troubleshooting tips, you’ll be stitching smoothly in no time!
FAQs on Threading a Sewing Machine
Do I need to raise the take-up lever before threading?
Yes, the take-up lever must be in its highest position before passing the thread through its guides.This sets the correct thread path and tension.
How often should I rethread my sewing machine?
Most sewing experts recommend rethreading before every new project or fabric change. Also, rethread any time you have excessive thread bunching or tension issues. Keeping a fresh threading prevents tangles and skipped stitches.
Why is my needle unthreading constantly while sewing?
There are a few likely causes for this:
The thread is too thick for the needle size.
Rough surfaces on the throat plate cause snags.
Nicks or burs on the needle create friction.
Try switching to a larger needle size, cleaning the throat plate area, or changing the needle if damaged.
What type of thread should I use for sewing knit fabrics?
Use a polyester or polyester-wrapped poly thread for best results on stretchy knit fabrics like t-shirt material. The polyester has more elasticity to prevent skipped stitches and popping on the stretch seams.
Do I need to hold the threads when starting to sew?
It’s a good practice to hold both the needle and bobbin thread tails loosely toward the back when starting a new seam. This sets the correct thread tension for the first few stitches before releasing.
***
Ready to put your new threading skills to use? What sewing project will you tackle first now that you’re a machine threading master? Share your thoughts in the comments below!
***
Main image: pexels


